Monday, 30 May 2011

Week 13 - Superstructure complete

 
We were hindered slightly by the bad weather this week, with strong winds and heavy rain making life difficult for the builders. The plastic covering on the first floor is pretty slippery when wet! Transferring materials up to the first floor was also heavy-going for the builders.


We now have something the shape of a house! We asked the builders just to 'rough out' the blockwork for the gable ends. When the trusses are up we'll have a more accurate guide to be able to cut the last blocks to shape and complete the gable walls ourselves.


So that's it, superstructure complete in just 2 weeks. We're mighty impressed with the speed and accuracy of the blockies, as is the building inspector who has signed off all the work without comment.

The roof trusses arrive next week...

Sunday, 22 May 2011

Week 12 - Part 2 - First floor walls started

The second half of this week involved a lot more fiddly stuff (window heads and the string course), so everything progressed at a slightly more believable pace.
Thursday evening and the ground floor window heads are in, and inner leaf blockwork built up to the level the joist hangers need to go in. Kai spent Thursday evening fixing the hangers in place ready for Bob to continue block laying the next day.


Friday evening and 3 more courses of inner leaf are up. You need a minimum of 3 courses of blockwork over the hangers to fix them in properly, before you can load them up with joists and flooring. Bob wanted the flooring all finished by end of Saturday so that the space could be used to store piles of blocks ready for the next day's work.
Joists in and temporary bracing and restraint strapping fixed to the top flanges. The joists are manufactured by Steico, they're engineered timber I-joists manufactured from 8mm structural fibreboard webs (hardboard) and pine flange material. They're fine when facing the right way up, but when on their side they're incredibly floppy and you have to be careful not to snap them!


The joists site on the joist hangers, which are built into the inner leaf. Special hangers are required in the zone of the french doors because there won't be blockwork on top to fix them in position.


Noggins fix to the joist ends to add more restraint.
Making a start on the flooring:


Half way through the flooring. It's called Egger Peel Clean flooring, made of 22mm thick chipboard with tongue and groove edges. The flooring gets glued to the joists and at each joint to make the whole floor a lot stiffer. We went with the slightly more expensive 'peel clean' option (a polythene cover that you peel off when you're ready) because it gives you up to 40 days protection against rain, people walking on it and storing materials.


And the flooring is finished. The first area where the glue has already dried has been loaded up with Celcon blocks on plywood boards to distribute the loads.


We propped underneath the longest span to make sure the beams don't deflect too much.
Noggins (cross-pieces) are required under partition lines.
The ground floor spaces are beginning to look more like rooms now.


The stairwell. Two joists are connected together here by special plates because of the loads that will get transferred from the stairs. Travis Perkins (our main supplier for all the materials) have a design service for the complete floor system. It comes as a package with instructions on which joists and hangers go where. The only modifications you have to do are to shave off a few millimetres off the ends of the joists to suit the walls if required.


Sunday, the next lift of scaffolding ready for the builders to continue the first floor walls. Too windy to lay any blockwork today - gusting up to 30mph Celcon blocks would just fall over...

Wednesday, 18 May 2011

Week 12 - Part 1 - Ground floor walls

Wow, what a busy few days! With the arrival of Bob the Builder (yes, he is called Bob), things have started moving at a real pace. Bob and his bricky mate Ryan finished off all of the plinth brickwork in about 5 hours. We reckon these guys are capable of laying a thousand bricks a day, which is probably typical of most brickies working as a 2+1 (2 brick layers and a labourer).

Bob might actually be Father Christmas doing odd jobs during the summer months...

The finished brick plinth.


With the arrival of labourer Andy (or Horse as Bob and Ryan call him), the team blasted through 2 meters of inner leaf in the first propper day. You're allowed to do this many courses of block all at once in Celcon because it's light enough not to squash out the wet mortar lower down.
This photo was taken at lunchtime on Monday, and by the end of the day they had made a start on the outer leaf dense blocks as well. Poor Andy get's worked like a dog trying to keep up with the other two amid constant banter and shouts for "MORE MUCK, MORE BLOCKS". It's all very entertaining.


By Tuesday the outer leafhas caught up. You can just see the Celotex insulation within the cavity. Decorative stone window cills are in and covered to protect them.


Also the internal walls are half way there.


Gaps in the outer leaf for the electricity and gas meter boxes. The builders use compressed concrete bricks for all the fiddly areas in the outer leaf, rather than messing around cutting blocks to size. They lay about 600 blocks in a pretty normal 9hour day which is exceptional, most 2+1s will lay between 300-400 a day. Despite the fact that these guys work quickly, the quality of their work and attention to detail is spot on - or Bob-on as we call it. They think through all the coursing and block lengths, so there's hardly any waste from cut blocks. They're also incredibly tidy and clean up thoroughly at the end of every day.


By half way through Wednesday the internal walls were complete, and Bob's team had run out of work to do until they can work off the scaffolding.
Looking from the kitchen towards the front of the house.


Wednesday evening the scaffolders erected the first 6foot lift. The site is getting very tight on space, and we have deliveries of floor joists and loads more materials in the next couple of days! It's tough keeping up with Bob!


Completed internal walls.

Sunday, 15 May 2011

House Plans

Some house plans to put the whole thing into context!

The house is positioned in the back corner of the plot, so that the frontage will line up with those of the other houses along the road, and so that the houses will have roughly equal space between them. This was done to get the design through planning permission. As a result of this, there is a narrow 2m strip along the back of  the house, we hope to put decking there to make the most of the space and the view. To the side of the house will be a small garden area. All the space in front of the house is taken up by parking for two cars and a turning head. Planning requirements these days need you to be able to leave your driveway in a 'forward gear'. The turning head on the plan looks slightly excessive, so we might try to pinch a bit of space back for the garden.


Ground Floor
The living room and kitchen diner should both be quite generous spaces. The French doors will open out from the kitchen onto the decked area with the view out to the field. The wc has been shoe-horned under the stairs because planning requirements insist on having an accessible toilet (doorway wide enough for a wheelchair) on the ground floor of any new home.

 
First Floor
Three bedrooms and a family bathroom. The main bedroom will have French doors and a juliet balcony, to make the most of the view out to the field.

 
Elevations
With a total floor area of 100 square metres, the house is not your typical Grand Design, but it will be perfectly formed!
The outside finish will be render. Above and below the windows there will be reconstituted stone heads and sills, and there will also be a string course (band of recon stone) at first floor level.


If anyone fancies having a closer look at the project in progress you're welcome to drop in! Be sure to bring cake.

Saturday, 14 May 2011

Week 11 - Ground floor screed

Well, when our concrete truck eventually turned up (over 5 hours later than we booked it), we were final able to pour the ground floor slab.
Geek note: 70mm thick, A142 mesh, 10mm aggregate, C28/35 CIIIA (36%-65% GGBS), offending supplier Cemex.


Kai uses his ingenious home-made 'wibbler' to get a smooth surface. We did a few passes and checked levels to try and get it  smooth and as close to level as possible.


Et voila! We won't load the slab up with too much stuff until it's gained some strength after a few days.


Big Delivery 1 - roughly quarter of all the stuff the blocky will need to get up to roof level. Big Delivery 2 will come on Monday, so this pile of stuff will become a bit of a monster!


A big pile of 50mm Celotex cavity insulation, and Catnic lintels for all the window and door openings.

Sunday, 8 May 2011

Week 10 - Underfloor heating pipes

We spent the week getting the DPM (damp proof membrane), reinforcing mesh and underfloor heating pipes laid out. The heavy rain stopped us from pouring the concrete slab, which we'll do next week, weather permitting.
After much research and many long discussions about the options for underfloor heating pipes - laid within the concrete slab, or a separate screed on top of concrete slab, or on top of conrete slab surrounded by insulation, and lots of other variations on a theme - we came to the conclusion that it doesn't really matter what you do, each method is accepted. So we've come full circle and opted just to do pipes clipped to the mesh with concrete poured around it all. Simples.
Following the rain, we discovered we have a pretty effective swimming pool...


We're about half way through clearing the area at the front of the plot, ready for our huge delivery of materials next week. A large chunk of the soil has gone to a soon-to-be relative of a brother of a colleague, to backfill a wall. It's all about having the contacts...


One or two tons - who knows? Kai did a quick modification to the trailer to make it easier to handle by grinding off the useless top half of the tailgate.


It's now been a week since we moved into the caravan and we have discovered that it is a bit chilly, a bit hot, a bit small, a bit wobbly - BUT IT DOESN'T LEAK! After the torrential rain of the weekend we expected to find a couple of damp patches, but nothing! This makes us very happy.

Monday, 2 May 2011

Week 9 - Ground floor structure

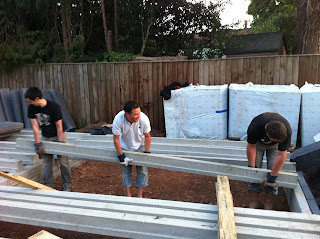
Delivery of the precast concrete T-beams for the suspended ground floor. The largest beams were 4.75m long and weighed 350kg each - glad the truck came with a crane! Many thanks to Arfon and Chen who came for a bbq but ended up lugging beams around well past dusk!


The insulation which sits between and below the beams is called Platinum Beamshield Plus, basically polystyrene with a graphite component which improves insulation performance. At 320mm thick this is really high spec stuff which they normally use to achieve Code 6 (super-dooper) sustainable homes! We acquired the stuff on the cheap via a special contact no questions asked paid with cash say no more wink wink nudge nudge ssshhhhh.


Setting out the beams and fitting Beamshield blocks in between...


The 'toes' of the Beamshield blocks hang beneath the T-beams, forming a layer of insulation beneath the beams, minimising cold bridging.


Double beams are provided in areas of higher loading, like where there are load bearing walls. Double beams have to be grouted up with concrete so they'll work together.


 The first course of Celcon blocks laid, cut to fit around the ends of the beams. Celcon blocks - lightweight aircrete with much better thermal performance than dense concrete blocks - are required for the inner skin to meet modern building regulations. If we were building this last year under the old regs then we'd be using dense concrete blocks for both skins, and the finished house would probably be more expensive to heat. Cutting the intricate shapes is pretty easy in Celcon because you can use a normal saw.
 

Kai made a start on the brickwork for the plinth. The blocky will probably complete this when he comes in a couple of weeks, but for the moment it allows us to backfill and get rid of some of the excess spoil we have piled at the front of the site. We're going need the space for the delivery of 4000 blocks, 10 tons of sand, and 90 bags of cement for the blocky!